Prelude
In September, my contract at an animation studio in London, where I was working on a challenging production, came to an end. The pressure and volatility that have become the norm in our industry over the past few years overwhelmed me, and I decided against pursuing another short-term extension. The COVID pandemic, followed by strikes in Hollywood and subsequent studio reckoning, led to a significant consolidation of productions. Many talented colleagues around me lost their jobs over the last year and a half, while I was fortunate enough to remain employed. However, the circumstances have changed drastically since my time in VFX and animation.
During my tenure at a major studio in London, I had endured several rounds of redundancy. In November 2023, I had enough of being in and out redundancy processes and decided to seek a new opportunity. I applied and secured a job at a medium-sized animation studio, where many of my friends and colleagues had worked. I was excited about the prospect of working in a smaller, more collaborative environment, away from the constraints of a large corporate behemoth.
Unfortunately, my expectations were not met. The studio was chaotic, with an unreliable and underdeveloped pipeline and technology. Inexperienced production coordinators placed excessive demands on the team, creating a stressful work environment. Despite these challenges, I must acknowledge the talent, dedication, and kindness of my colleagues. We were all in this together, supporting one another through thick and thin.
When my several (short) contract extensions ended in September, I decided it was time to take a break from the demanding work in the VFX and Animation industry after seven years. Unfortunately, in this industry, especially when working on a big feature film, everyone is focused on their own department and specific task. For me, it was lighting. Fortunately, in feature animation, we also handled our own compositing. Specialising can be a double-edged sword. While it can lead to exceptional skills in a particular area, which is often required for big productions, it can also make it easy to lose touch with other areas of production and the latest techniques and practices.
I’m noticing that due to the decline in the number of big projects being commissioned, we now have to consider smaller studios where specialised skills are valued. However, artists in these studios often have to handle various other production tasks, which can hinder the pursuit of hyper-specialisation and may make it difficult to secure a job at a smaller studio.
This website and my blog serve as a testament to keeping my creative passions alive and preventing me from falling into the trap of being a one-trick pony. By doing so, I aim to ensure that I have a diverse range of skills and experiences, even when work dries up.
Back To Photography
Photography has always endured as my strongest passion. I find the immediate response of capturing photos to be very special. It’s a craft of decades-long dedication, patience, and a very keen eye. Having always worked on my photography craft and keeping my social channels up-to-date with my latest and greatest work meant that I had a few gigs lined up as my contract was coming to an end. I had a month-long wedding shoot which kept me sustained, then followed another wedding and some other photoshoots also came my way, all without having to do much direct marketing. All came through friends and acquaintances that needed someone to take photos of themselves or their events that they knew and could trust.
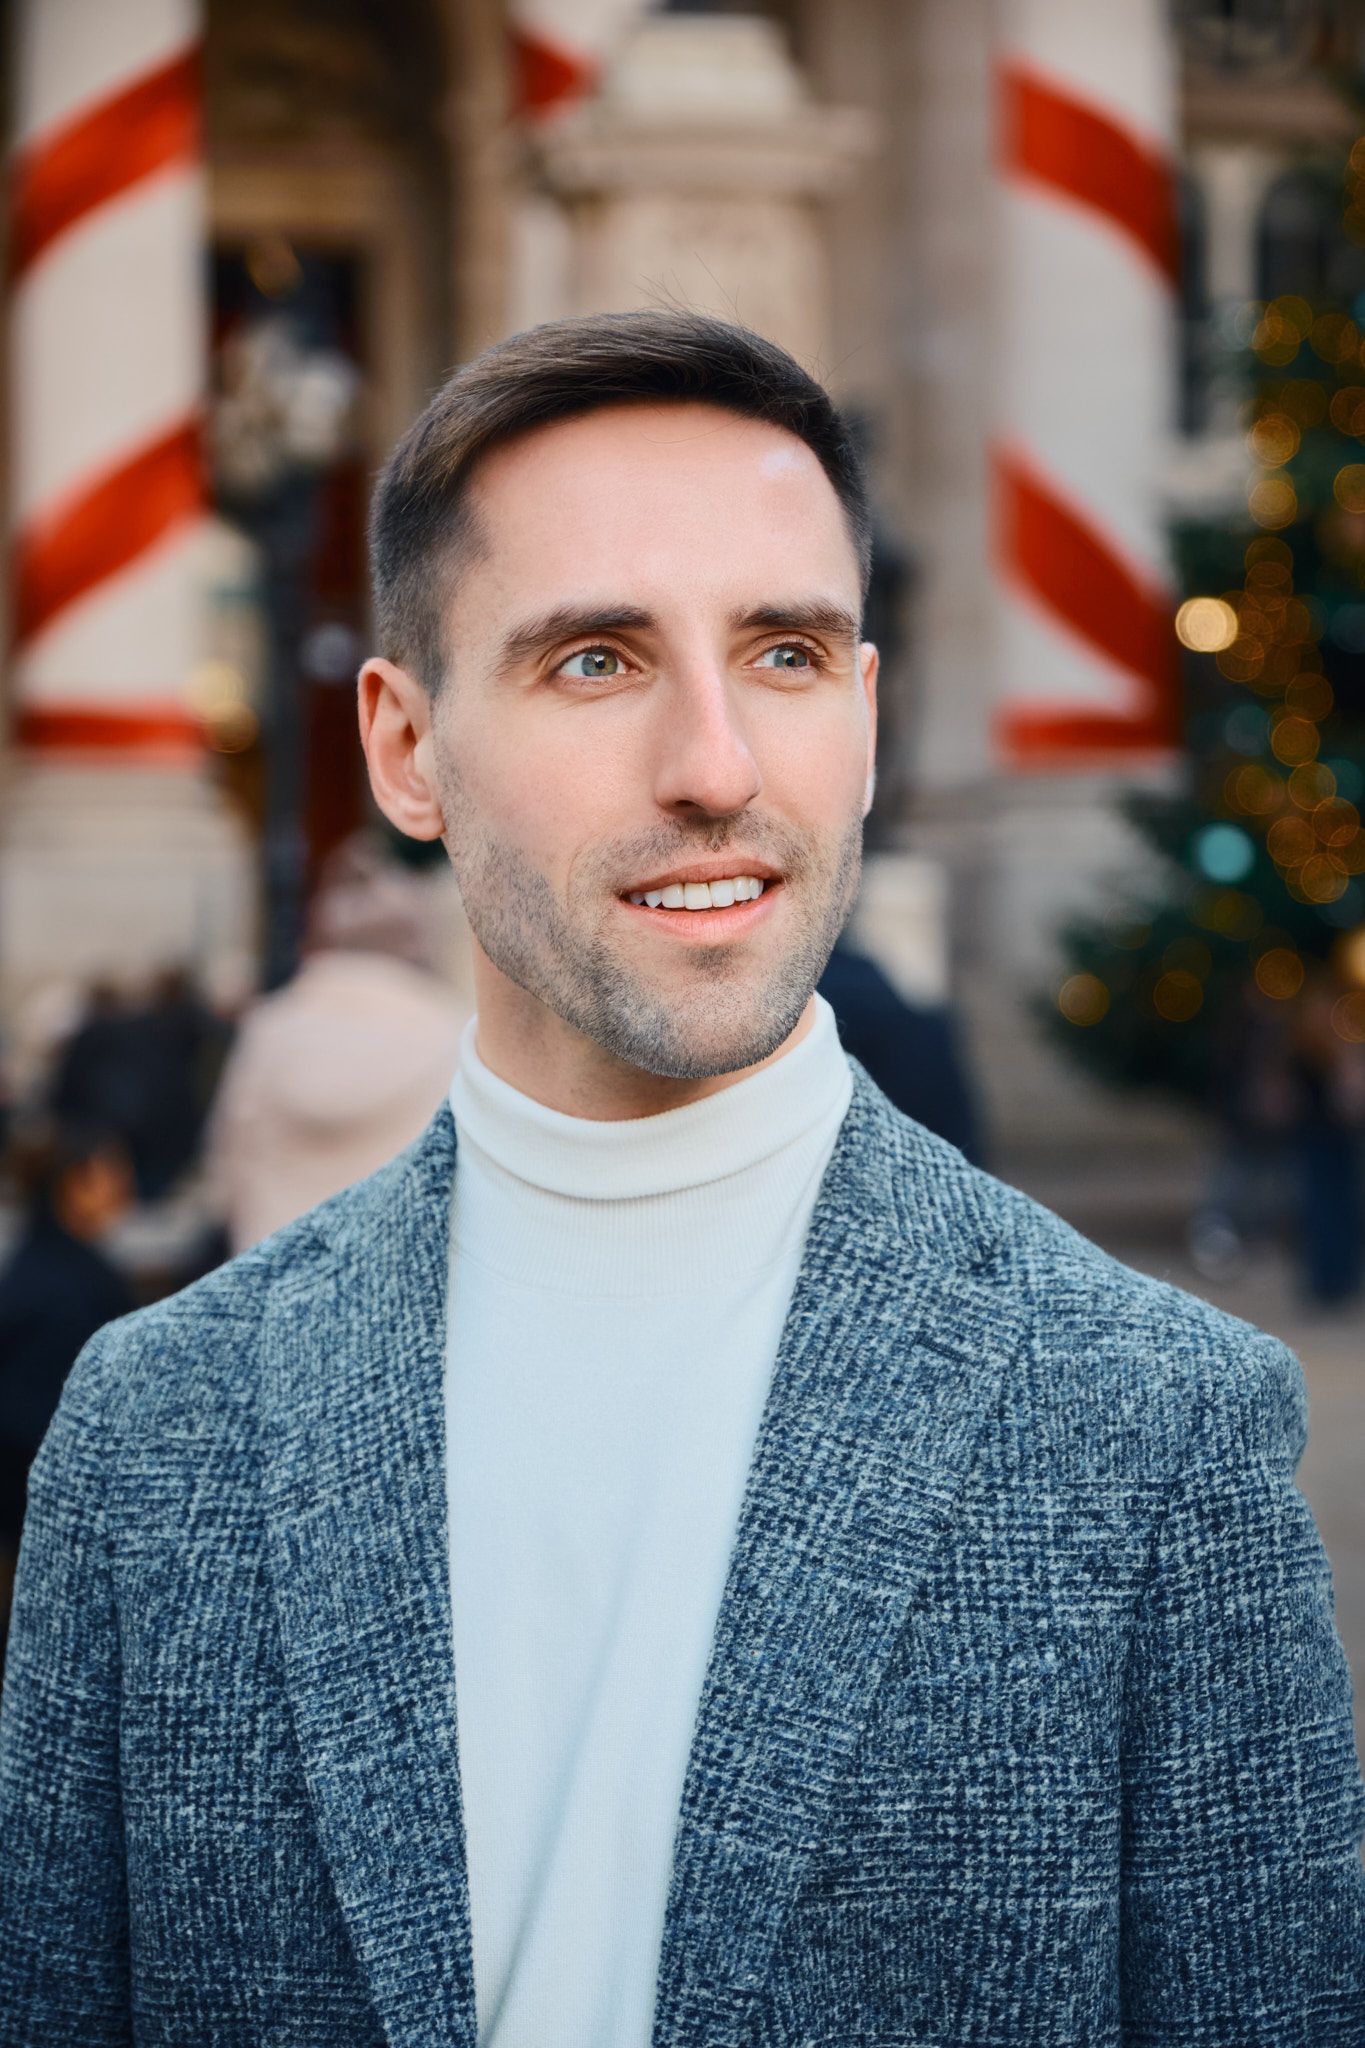
One such shoot would be the one with my dear friend Owen. He himself had a new exciting beginning ahead of him and wanted to memorise that with some photos of him. As friends, we worked together quite well on our shoot and I was very pleased that he came out very happy from our collaboration.
Below, I want to discuss my tools and techniques in my work and how I achieve the final results of my work.
The Camera
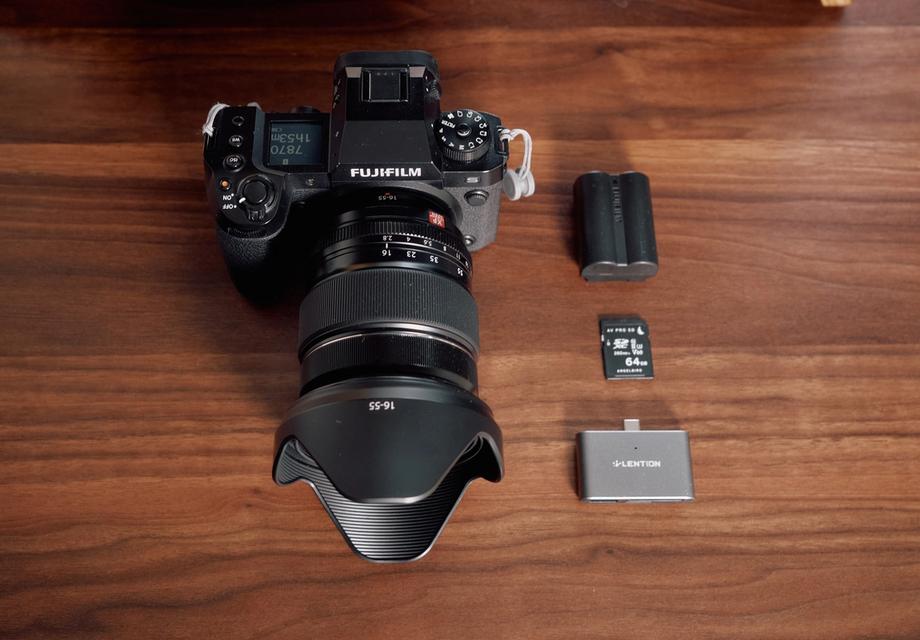
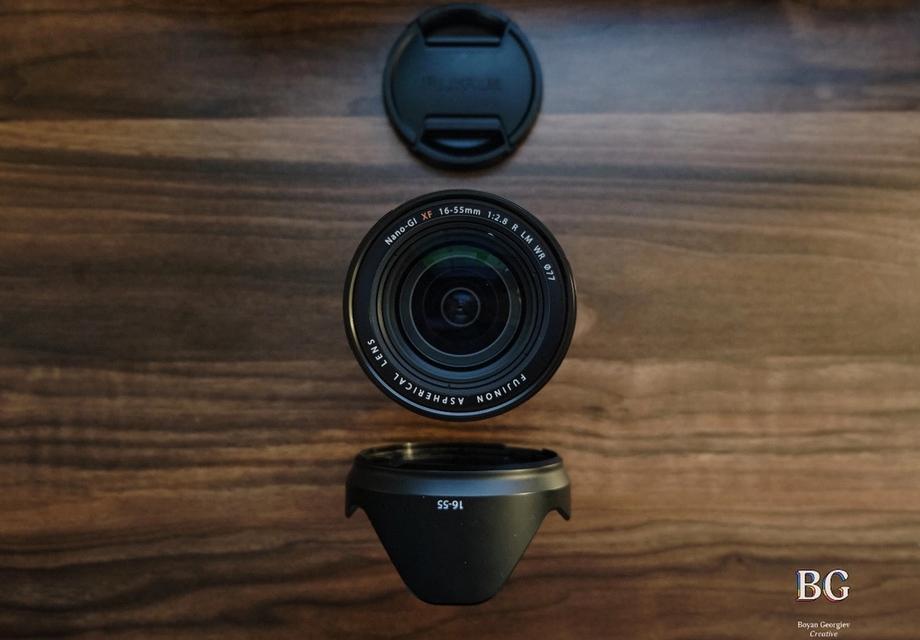
It all starts with the camera — for me, that’s Fujifilm. Over the past 5 years, I’ve been using Fujifilm cameras. I started with the classic-looking X-T3, and now my workhorse is the X-H2S with the XF16-55mm f2.8. Both that camera and lens make for a great combo with which you can achieve a wide variety of creative work. I love working with natural light, which can be tricky sometimes in the UK. Although winter shooting in London when the sun is out is so magical. Fortunately, myself and Owen lucked out massively and had a fantastic sunny winter day. Winters in London make for short days, but the sun is always low and soft and is perfect to have as a beautiful key light on my subjects.
We started our shoot around Southbank along the river Thames and made our way to The City of London. The soft winter sun made a beautiful warm glow on Owen and the crisp blue skies made for a great contrast with blue tones around the shadows.
The most important thing when photographing people who are not professional models is to make them comfortable and part of the process. The reality is that most people feel uneasy and anxious when someone stands before them with a big camera and lens to take their photos. Being able to break the ice and make compliments might help to put your client at ease. Another thing that also helps is to explain to them how you’re about to work. I give a brief rundown of how we’ll work together, letting my clients know that I will be showing them the results as go along so that they can make any adjustments to their posture and outfit as they find fit. I find that honing in on the final style as much as possible in camera while taking photos to be very important so the clients know what the final result would look like. Fortunately Fujifilm cameras excel at that. They include fantastic film styles that are the base to all my photos. I usually shoot with Nostalgic Neg as it gives a beautiful warm and balanced look while still being punchy and it’s a great balance of modernity and nostalgia — hence the name. I am sure to dial in my white balance, other things that Fuji cameras allow is dial in contrast through the shadows and highlights tone curve and the very special Color Chrome Effect.
Getting all of the settings right in camera is something that first makes you more confident in the final result when it’s time for editing but also it brings confidence and trust with your clients as they won’t be shocked if what they saw on the day and what you deliver differs greatly.
Experimenting and giving your clients the freedom to make suggestions and bring their ideas forward is what will make your photos sing and have a great time throughout the process which is what this is all about.
“ Fujifilm excel at presenting beautiful colours in camera. They include fantastic film styles that are the base to all my photos ”
The Post-Processing Process
I love taking photos but I also take great joy is sitting down with a good cup of coffee and getting into the editing process. This is really where photographers hone their style and make a stamp that is undeniably their own.
Privacy Notice
This video is hosted on YouTube. Loading it requires allowing functional cookies.
CaptureOne 🫱🏼🫲🏾 Fujifilm
Photo editing in Capture One
Since using Fujifilm camera I also changed my editing software from Adobe Lightroom the most popular photo editing software after Photoshop to something that is no mainstream but an industry standard - CaptureOne. The reason for the change is when reading about Fujifilm cameras and how their files are handled there’s a myth that Lightroom does not handle them well due to the unique way that Fujifilm have decided their camera sensors that is different to any other. I can’t speak whether this is true or not but what I can confirm with certainty that CaptureOne does handle image files differently. It’s hard to describe exactly what but I know that the RAW files have a subtlety to the colours and contrast that just better in my eyes. And when it comes to speed CaptureOne is unmatched, no wonder it’s the gold standard during high-profile studio shoots, e-commerce and other types of high-stakes, high-volume photography. I often come back with 1000+ images from a shoot and speed is essential, from choosing your best photos to editing one photo and propagating the style across many others.
Speed & efficiency
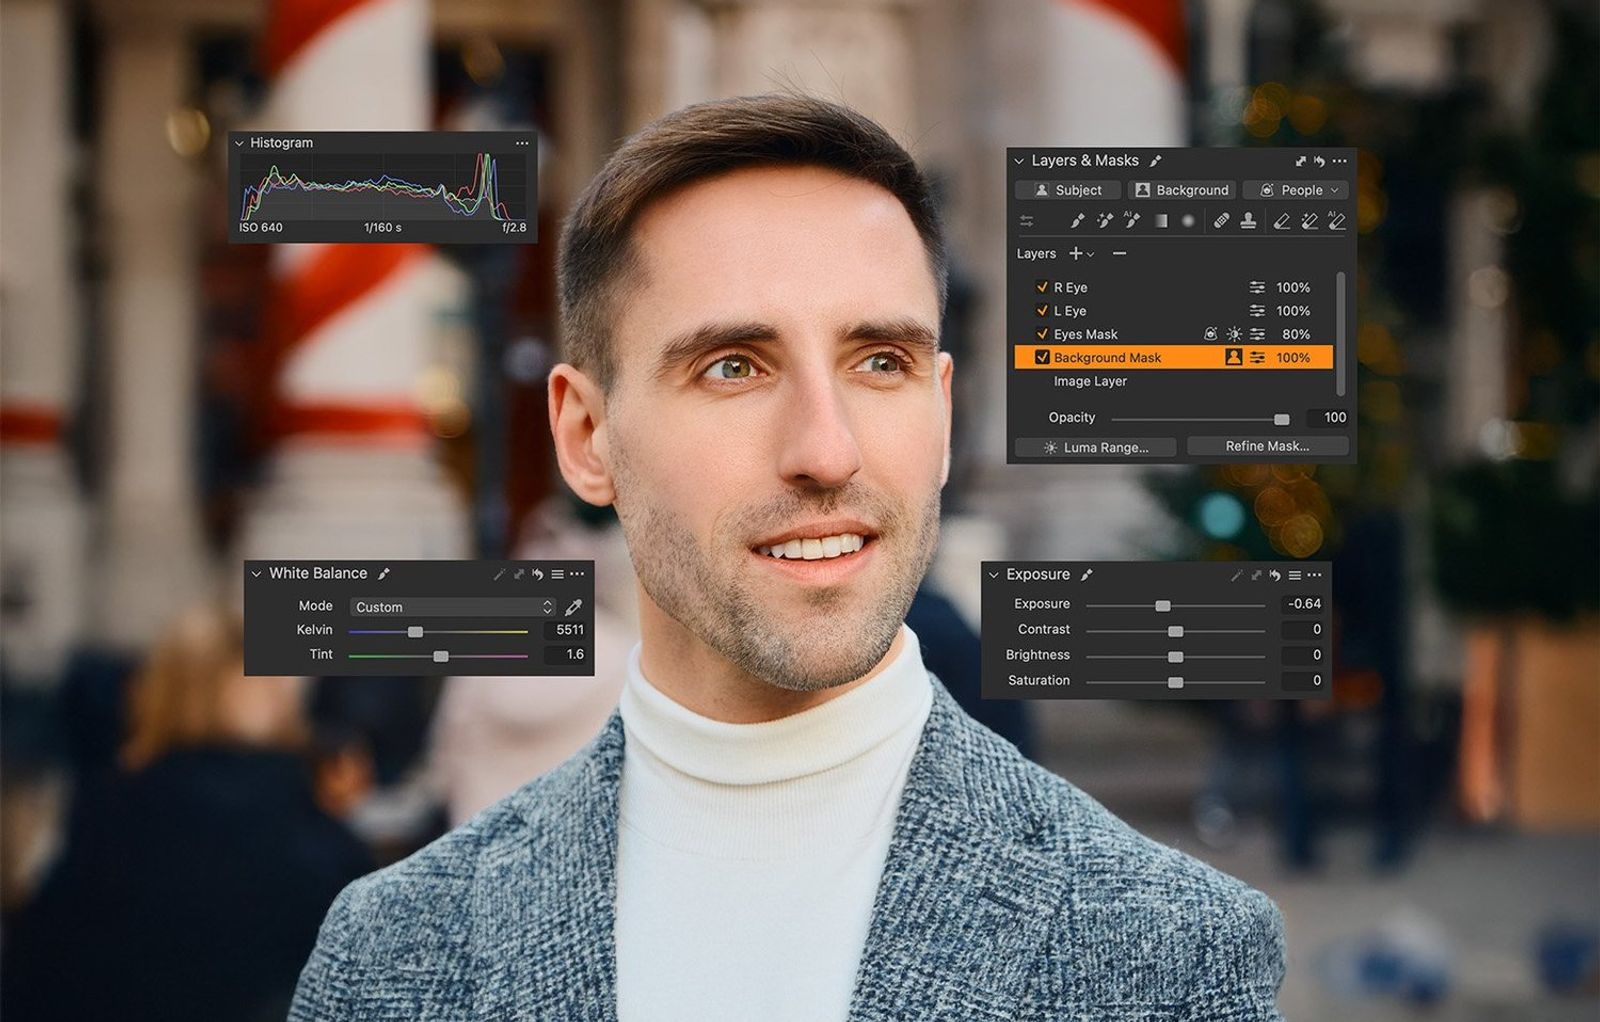
Speed is essential for professional photographers. The less time you spend grappling with software and technology, the more time you have to engage in your creative flow. This efficiency allows you to focus on completing your projects swiftly, ultimately enabling you to take on more business opportunities and gro w your success. This is where CaptureOne really excels. Browsing through 1000s of photos is as fast as I can see them, and applying styles and edits across is swift. I also find the export recipes another strong point. Often I need to export photos with multiple intended purposes, such as full-res photos to deliver to the clients and for archival purposes, some that are web-optimised to upload here on my website, and versions for printing that require a special profile and format for export. All that is super easy to configure and save for consistent file deliveries. Recently, many great new improvements to masking have been made, one of the things I employ on almost all my photos. The new set of efficiency and control comes through the new masking powered by machine learning. It takes a mere moment to make perfect masks of the subject, background, or even very specific parts of a subject, such as iris, sclera, face skin, etc. This means I can have an even greater control over my image without having to spend precious time creating masks in Photoshop and having to round-trip across various applications to achieve my desired look. I welcome all these new fantastic changes in CaptureOne; they have really delivered and executed what working photographers need. Copying and applying the AI masks to other images also happen in a very intuitive way; new masks are automatically generated for a batch of photos, and the adjustments are applied dynamically to those.
Over the years, I’ve developed my own style of photography that incorporates certain techniques during the actual capture process. Having taken countless photographs throughout my life, I’ve developed a heightened sense of capturing the desired look and feel of an image. This involves being present at a specific location during a particular time of day, waiting patiently for an event to unfold, or altering my perspective and vantage point to tell a story.
When photographing people, I pay close attention to the lighting conditions, as I primarily use natural light outdoors. While there are certain golden rules for shooting at sunset to achieve soft, flattering lighting for the subject, it’s important to remember that these rules can be broken with intention and purpose.
Sometimes, I intentionally use harsh lighting to my advantage. During the summer months when the sun is high in the sky for most of the day, I exploit the harsh shadows cast by buildings to create a frame within a frame. For example, I might place my subject primarily in the shadow of a building, allowing them to just peek out and catch the sun on their skin. This technique works particularly well with individuals who have well-defined features, such as a strong jawline and sharp cheekbones.
However, if the subject’s skin is not clear, it’s crucial to avoid exposing them to harsh lighting that could create noticeable shadows around blemishes. The goal is to assess the situation and determine the best approach to make the client look their absolute best.
In the examples below featuring Owen, I took advantage of the winter sun to bathe him in a warm, soft light. Since he has well-defined features, this technique strikes a beautiful balance, showcasing his features without creating harshness to his skin.
Privacy Notice
This video is hosted on YouTube. Loading it requires allowing functional cookies.
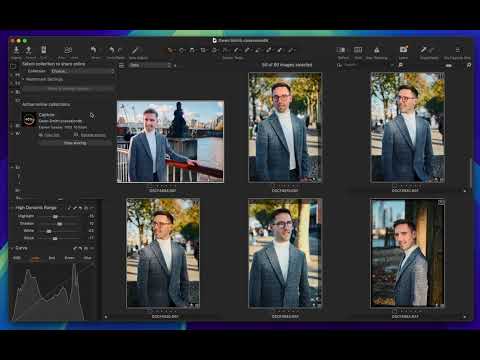
Client Reviews - CaptureOne Live
CaptureOne Live Feature for Photo Review by Clients
By capturing the best images during the shoot and having a clear vision of what and how I want to modify when I sit down to edit the photos, I start importing the images and making an initial selection of the ones I believe are the best. Next, I apply a base edit using one of my presets, which has a subtle film tone and colour curve. This feature within CaptureOne is fantastic for sending the photos to my clients so they can review the results and let me know which images they resonate with the most. It’s convenient that I don’t even need to export the images; the entire process happens within the photo editor. I simply select the images I want to share, click “Share Online,” and they upload swiftly, providing me with a link to share. Clients can mark photos using a star or colour system and leave comments that I can view directly in CaptureOne, saving time and maintaining excellent communication with my clients. By continuing to involve my clients in the process, I ensure that they feel heard and understood, as they truly are, always seeking their feedback to avoid any uncomfortable conversations.
After the initial selection and applying a base edit to the images, and receiving feedback from the client, I proceed to the next step—thoroughly refining each image to make it shine. The recent addition of AI-assisted mask creation in Capture One has been invaluable. I can simply click to select the subject, background, or use the AI brush for custom selections, and it excels in creating high-quality masks that typically require no further adjustments.
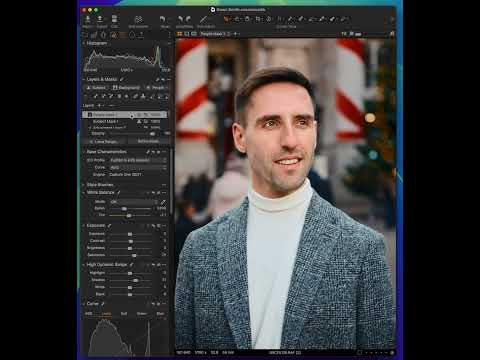
With these tools, I begin making individual tweaks to various parts of the images, ensuring a balance of elements such as white balance, contrast, and colours. In the images featuring Owen, I darkened the background and added a slight warmth using the white balance tool. I also applied another mask for his pupils and irises, slightly sharpening and saturating them. Finally, for the subject overall, I reduced the warmth and toned down the magenta in his skin.
Another extremely useful feature in Capture One, which I miss in Lightroom, is the Skin Tone editing option within the Colour Editor panel. Here, you can sample the skin tone of your subject (or any colour) and adjust the uniformity of hue, saturation, and lightness. This is particularly handy in scenarios like winter shoots, where the subject's nose might appear a bit red due to the cold. This tool allows you to balance any inconsistencies, ensuring the subject's skin looks even and vibrant.
Privacy Notice
This video is hosted on YouTube. Loading it requires allowing functional cookies.
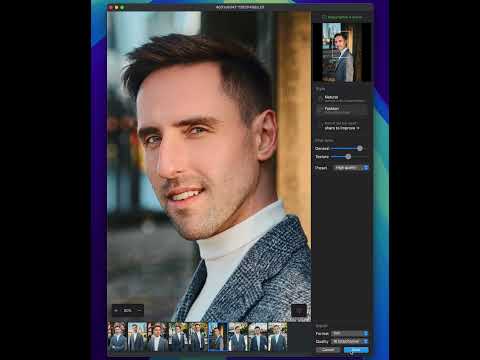
AI Retouching with Reblum
Reblum AI Photo Retouching
The final step in portrait photography is often retouching, traditionally done in Photoshop as a largely manual, per-photo process. However, with AI tools seemingly appearing every day—designed to ease our lives of laborious, repetitive tasks—I’m excited to embrace those that allow us to work creatively with fewer obstacles while preserving our artistic control. One such tool, introduced to me by the talented Tyler Stalman in one of his videos, is Reblum, an AI-powered retouching solution that integrates directly with Capture One.
Personally, I’m not particularly invested in or skilled at retouching. There are countless talented professionals who have mastered this craft and made it their career, and this tool is by no means a replacement for their expertise. That said, my style tends toward shooting in natural conditions, striving to maintain an authentic look in my images and subjects. This is where Reblum feels like the perfect fit—it doesn’t overdo the retouching or airbrush clients into looking like they belong in a glossy ad. Instead, it provides a subtle polish, ensuring the final result remains true to how people looked when photographed.
For those interested, I’m happy to share a link offering a worry-free 14-day trial of Reblum, plus an exclusive 20% discount on various licensing options.
Currently, Reblum offers two retouching modes: Natural and Fashion . Both are subtle, but as the names suggest, the Fashion mode applies a more polished look. Additionally, there’s a slider that allows you to fine-tune the level of retouching to suit your preferences. I’ve seen previews of upcoming features, and it looks like some exciting new additions are on the way to further enhance customization.
One of Reblum’s standout features is that it processes everything locally on your computer, so no images need to be sent to the cloud. On my M1 Max-powered MacBook Pro, it runs efficiently and processes batches of photos quickly. This batch capability, combined with its speed, makes Reblum an invaluable tool for improving productivity while maintaining creative integrity.
Reblum 20% Discount
Use Code: NJQ.4056
Now that I’ve shared some of my workflow, I hope readers find it at least somewhat useful. I find it fascinating to read about the processes others use at work, and there’s a lot to learn from each other. Everyone has a unique way of working, but it can be challenging to stay up-to-date with the latest features and trends. I look forward to hearing from anyone who has questions about the things I’ve discussed so far. Feel free to reach out through the contact form on my about section or comment in the comments section below.
Thank you for reading, and here’s to a creative and prosperous New Year!